Submitted by Jason Dockter, Lincoln Land Community College
The example provided here addresses the following OWI Principles:
- OWI Principle 1: “Online writing instruction should be universally inclusive and accessible.”
- OWI Principle 10: “Students should be prepared by the institution and their teachers for the unique technological and pedagogical components of OWI.”
- OWI Effective Practice 10.1: “Appropriate OWI preparation should begin with interface familiarization and experiential exercises that make clear the public (i.e., communication to/from the teacher and among all students in the course) and private (i.e., communication between the teacher and individual student) spaces. Students need to be introduced to the writing-course specific uses of the LMS. At a minimum, students need to know where to access their assignments and readings, where to post and retrieve formal writing, where to meet and write publicly with peers, and where to communicate privately with the teacher and peers.”
- OWI Principle 11: “Online writing teachers and their institutions should develop personalized and interpersonal online communities to foster student success.”
- OWI Effective Practice 11.3: “Instructors should set expectations about course objectives, assignments, and learning by communicating with students one-to-one and as a group, regularly and systematically, using both asynchronous and synchronous modalities.”
This class orientation module, which features video walk-throughs, is implemented in a community college first-year composition (first and second semester) asynchronous online course. This can be done in any LMS, with a variety of technologies. My institution uses Blackboard and SoftChalk. So I have embedded videos and captioning of the videos within a Softchalk presentation. However, I have published these teaching materials on the web (in a WordPress site) to demonstrate that neither Softchalk nor Blackboard is essential to presenting these materials (address provided below).
In an attempt to help all students access the online class and feel comfortable moving into the first module of the class, I created these videos. They’re purposefully brief, but each video aims to accomplish a specific aspect of orienting students to my particular online class, preparing them to begin the work of the course in a confident manner.
Explanation of effective practice
When students enter an online course, whether or not they have taken an online course before, they have to make sense of the digital space of that particular class. Because there is not a universal online course design template that all instructors follow, nor are students as familiar with being online students as they are with being face-to-face students (f2f), students have to learn the course layout and determine how a course operates (even just how to begin) each time they take a class.
Upon the initial course log-in, students may feel uncomfortable about how to proceed within the class. Potential confusion about basic online course navigation can exacerbate already existing feelings of uncertainty and isolation that many online students experience. Although many online instructors provide a welcome announcement to the class or even an email prior to the class about how to begin, in order to help ease students into the online class, written directions alone may not be enough to help ease students’ nerves regarding their new online class.
To help students transition more easily into my online course and to feel both more comfortable and more confident in the new digital environment of this specific course, I provide an orientation module to the class, which features video walk-throughs to help students feel comfortable with how the course is laid out and how its pieces connect.
When students enter the online class initially, they visit the orientation module, named EGL 101 Orientation, as the starting point for the course. This is the first item in the course menu within the LMS, as shown below.
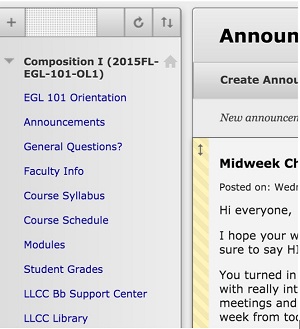
Figure: Course Menu Showing Orientation Module
In this orientation module, I include three different videos that I have produced and provided written transcripts for, shown below. These are all collected in one space within our LMS. The first video I present is an introduction to the instructor (named General Welcome to Class). The next video provides students with an overview of the writing projects they’ll complete within this course (named Focus of Work to Be Done to EGL 101). The third video explains to students how to navigate this particular online course (this video is named How to Navigate EGL 101).
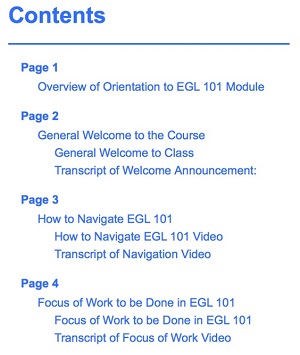
Figure: Menu of Orientation Module
After viewing the videos, my hope is that students feel confident about where to go in the class to accomplish the tasks required, the work they’ll do, and who the teacher is. Overall, I want to ensure that students are comfortable within the class, not left alone and uncertain about any aspect of the class. Since my course is an asynchronous online course, students are left to complete assignments and learning tasks on their own, with the activities being due at the beginning of the following week. I believe this effective practice helps make my online course more accessible than it otherwise would be if I relied upon a written ‘welcome announcement’ and assumed that students would know how to begin this online class.
This effective practice takes the idea of the ‘Welcome Announcement’ and enhances it to be an overview of the course, a navigational guide, and an introduction to the instructor. Effective practice 10.1 stresses the importance of helping students become familiar with the design of the online course, and specifically, identifying the difference between public and private writing spaces and where assignments can be located and completed.
The key is that these elements are presented through multimedia, emphasizing the visual, aural, and gestural modes to increase the potential for students to make meaning from these course elements. The benefit of conveying information through the video medium is that students are able to visualize the instructor and begin to form a sense of who that person is and what her personality is. Additionally, instead of having to attempt to imagine how to navigate a specific online course design, a video screen capture can replicate almost exactly what students see on their own screens and can more accurately demonstrate how to move throughout the various areas of the online course.
Challenge this practice addresses
One recurring problem for online students can be lack of certainty about course layout and basic navigation within a given class, which can result in student frustration (see Brickman 361; Hewett, Writing 38; Peterson 367). When taking a new online course, students enter the class and have to figure out where to go and what to click. Unlike a f2f class, where students likely have years of experience and are familiar with what to do and where to go when they enter the classroom, online students aren’t guaranteed to know this.
The effective example practice presented here is intended to minimize student frustration immediately in the course by helping to familiarize them with the class, the course design, and the instructor. Students are actually shown what they will see – and shown where to go to accomplish certain tasks unique to this specific online course.
Instead of assuming that students will figure out how to navigate the class on their own, I intentionally demonstrate to students how to navigate the course and introduce myself to the students in the class. Instead of believing that the online course design is easily navigable and makes good sense, I assume that students will struggle to understand where to go and what to do within my particular class. Orienting students to each specific online course will help students to begin more confidently and feel more assured about being a member of that online course.
How to implement this practice
My orientation for my online course is comprised of a general written explanation of what is included within this unit and the three distinct videos with separate transcriptions. (All three transcripts are collected together within a single text, located within the EGL 101 Orientation area of the course.) While the orientation module resides within the LMS, I have recreated the unit through WordPress, which can be seen here: https://onlineorientation.wordpress.com/ (see tabs at the top of the page to find videos and transcripts).
General Welcome to the Course Video
The introduction to the instructor video should feature the instructor speaking to a camera (rather than, say a static image or other screen capture). For me, I talk about my time teaching at my institution, the courses I teach, my enjoyment of those courses, educational experience – stressing that I am here to help students learn and that I am available to help them throughout the course. To capture this video, any sort of video recorder will work, as will any video capturing software. A smartphone, tablet, or a webcam on a computer will all work equally well to record the video, which can then be exported to a computer or directly to YouTube. I record these videos using the webcam on my computer and the Quicktime software. From there, I upload them to YouTube for later export and embedding in the LMS.
Course Navigation Video
The guided tour video is a screen capture video of the online course. I use Quicktime or Camtasia to capture what I see on my computer screen. I enter the course in the ‘student view’ and talk students through where they are in the class and precisely where they should go next to complete the initial course activities. From there I proceed to review the items in the course navigation menu, and to enter into each area to explain what students will find there and its purpose for the class.
The initial step to begin this effective practice is to ensure that the online course architecture is in place (e.g. the main course menu, units or modules, instructor contact information, etc.). This is not to say, though, that aspects of the course cannot be tweaked as the course unfolds. But because the orientation video will demonstrate to students how to navigate the online course, the video should replicate as much as possible what students will actually see when they log into the course. Any major discrepancies between the video and what students see upon their visit to the class may increase the potential for student confusion, leading to frustration.
Overview of the Writing Projects Video
The video of the overview of the writing projects could be done in a variety of ways, depending on the instructor’s objective for the video. My video is of me talking to the camera (rather than a screen capture); I talk about the general focus for the work students will compose within my writing class. I also discuss how smaller writer projects in the class lead into the larger ones and may be readily incorporated into those larger projects. Because I do not get into specifics about assignment requirements, for I don’t want to overwhelm students on the first day, I prefer the talking head style. My primary intention is to give them a general overview of the work, while again, sharing more of myself with my online students.
If an instructor is interested in the talking head style video and displaying an aspect of the class itself, a screen-capture software, such as Camtasia, would allow for the recording of both. In this case, it might be nice to show students, again, where these assignment directions are located (if the course design keeps these in one space within the course). This would provide an opportunity to preview the actual instructions for an upcoming assignment(s) if the instructor opted to do so.
Or, the instructor might elect to talk through a short slideshow presentation in which the slides help to supplement the discussion of the written projects for the course. The slideshow could be recorded using PowerPoint or Apple’s Keynote. Then the recording could be exported directly to YouTube and embedded within the course.
This collection of videos and transcripts can be created in a variety of ways, using numerous technologies.
Hardware
Any sort of camera capable of recording video will work for the talking head videos. I use the webcam on my laptop, but could easily use a camera on a tablet, smartphone, or a digital camera. Aside from a computing device, through which the videos can be uploaded to a website, this is the only hardware required.
Software
Recording Video
To record videos that follow the talking head style, a computer’s webcam can be used and if using a mobile device, this will most likely be done through the camera app on the device.
To record videos that involve a screen capture, such as the course navigation video, the following options can work well. Camtasia costs money, but the other options are free.
Camtasia
Quicktime
Screencast-o-matic
Screencastify (use with Google Chrome)
Aside from recording the videos, reviewing them for transcriptions requires a word processing program, from which the transcriptions can be written and then copied and pasted into the LMS.
Editing
Once a video has been created, it can be edited, but it does not have to be. I prefer to use the raw video footage to preserve the miscues or mistakes that I might make in my delivery to demonstrate a little more of my own humanity for my online students. If you capture video and wish to edit it, some options would be:
YouTube’s free video editor
Camtasia
iMovie, if you work on a Mac
Windows Movie Maker, if you work on a PC
Hosting
After the videos have been created and edited (if you wish), each video needs to be uploaded to a hosting site. I opt to use free hosting sites, such as YouTube or Vimeo.
Embedding Video in LMS
The embed code can be copied from the hosting site and loaded into the LMS (or wherever the instructor opts to place the videos). The video below demonstrates who to complete this process: